Getting Started With Tuya API for IoT Development
Your first baby step into IoT development using Tuya API
Read my profile at https://hadna.space
If you are about to start a new journey in IoT development and do not know where to start, do not worry then, we are on the same page!
In this IoT series, we are going to learn about IoT development using Tuya API. And the posts in this series are dedicated for developers who have little to no knowledge about IoT development. All you need to have is some programming experiences, preferably using Python.
As a developer myself, I love to learn about new technology, and IoT is that one of many fields that I have not explore before.
What is IoT?
The Internet of Things (IoT) refer to a network of a group of physical electronic devices spread around the world that are connected to the internet, while at the same time collecting and sharing data.
IoT now can be achieved, thanks to the cheap computer chip available in the market, and the significant growth of wireless internet network. And these IoT devices can be as small as a small USB flash disk, to as huge as an airplane. The choice is yours.
Why do we need IoT?
In simple terms, IoT exist to make our life easier!
IoT enables you to control and collect data without having to have physical access to the devices. For a small scale IoT usage like smart home, it will enable you to control the electronic device in your house e.g. turning on/off lights, making coffee, controlling thermostat, playing some musics in your home-theater, and many other possibilities. In agriculture, IoT will help you to monitor your crops, automatically water your plants, soil analysis, as well as crops prediction & analysis.
Sounds interesting, huh?
But, I don't have any IoT device 😥
That's where Tuya will take place. By using Tuya, we will have an access to their virtual devices, and it will eliminate our needs to have a physical IoT device.
Yes, not having an access to physical IoT devices for IoT development could be somewhat limiting, but if you are just getting started with IoT (like me), it would be a great option to use virtual device.
About Tuya
Tuya Smart (NYSE: TUYA) is a global IoT development platform that builds interconnectivity standards to bridge the intelligent needs of brands, OEMs, developers, and retail chains across a broad range of smart devices and industries. Based on the global public cloud, Tuya connects different intelligent scenarios and smart devices by providing hardware development tools, integrating public cloud services, and offering an intelligent business development platform. Tuya provides comprehensive smart empowerment from technology to marketing to foster a neutral, open and accessible developer ecosystem. Source.
Why do we use Tuya API?
By the end of June 30, 2021, the Tuya IoT Development Platform served over 384,000 developers around the world, and generated over 122 million daily AI voice interactions. The platform has smart-enabled more than 410,000 device SKUs. Now, smart devices 'Powered by Tuya' are available in more than 220 countries and regions in over 100,000 stores all over the world. Source.
IoT Engineer salary
As an IoT beginner, you probably will not care that much about those two paragraphs above, and your goal now is to make your first IoT-enabled project. But to make it more spicy to dip your toes into IoT development, I find these valuable information for you.
Based on the data from Glassdoor, ZipRecruiter, and Salary.com, an IoT Engineer will make about $104K - $146K annual salary, or about $54/hour. Of course the data is mostly based in the US, but I think it's great to know the rates.
So, let's get our hands dirty.
Getting started
In this post, we are focused to learn about how to use Tuya API to control a LED-strip using their virtual device.
Prerequisites
- Tuya developer account. Register your account here https://developer.tuya.com/en/ and follow the instruction.
- Android or iOS smartphone to manage your devices. Get and install the app here https://developer.tuya.com/en/docs/IoT%20Device%20Management/how-to-download-app?id=Karlccatj46d5.
- Some Python knowledge
Step 1: Create a cloud development project
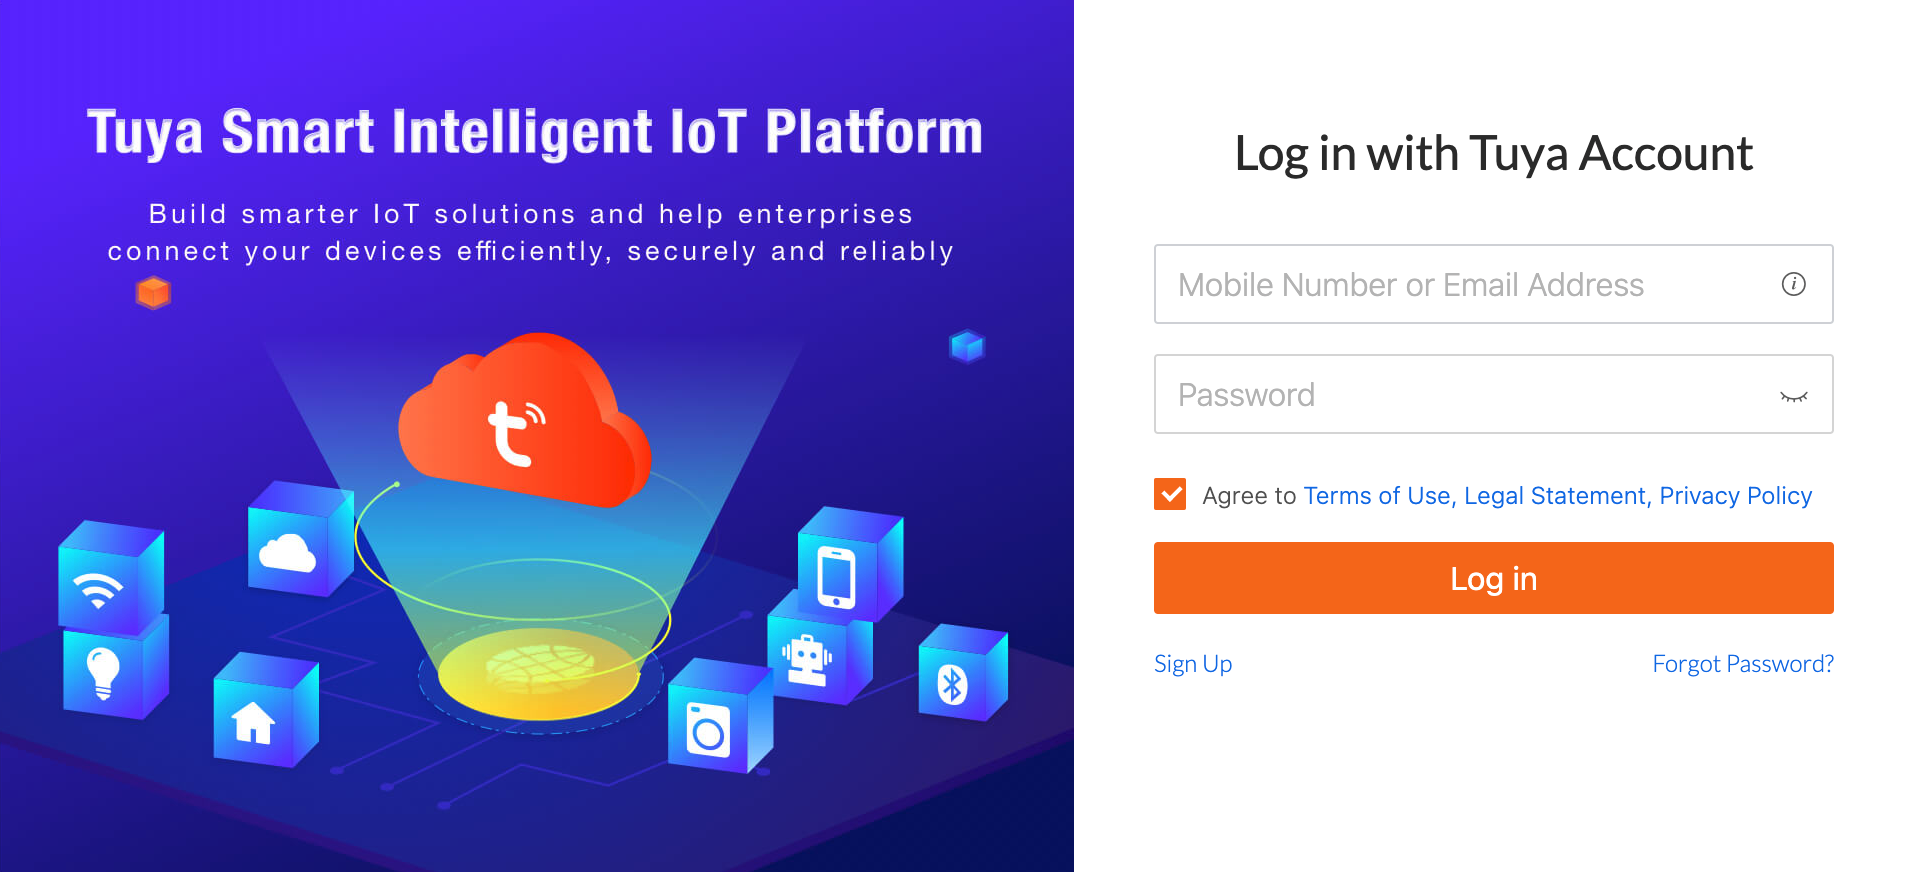
Login to https://iot.tuya.com/ using your developer account
In the left navigation bar, click Cloud > Development. If you are being asked to choose the plan, choose the Trial Edition. It's free, no credit card required.
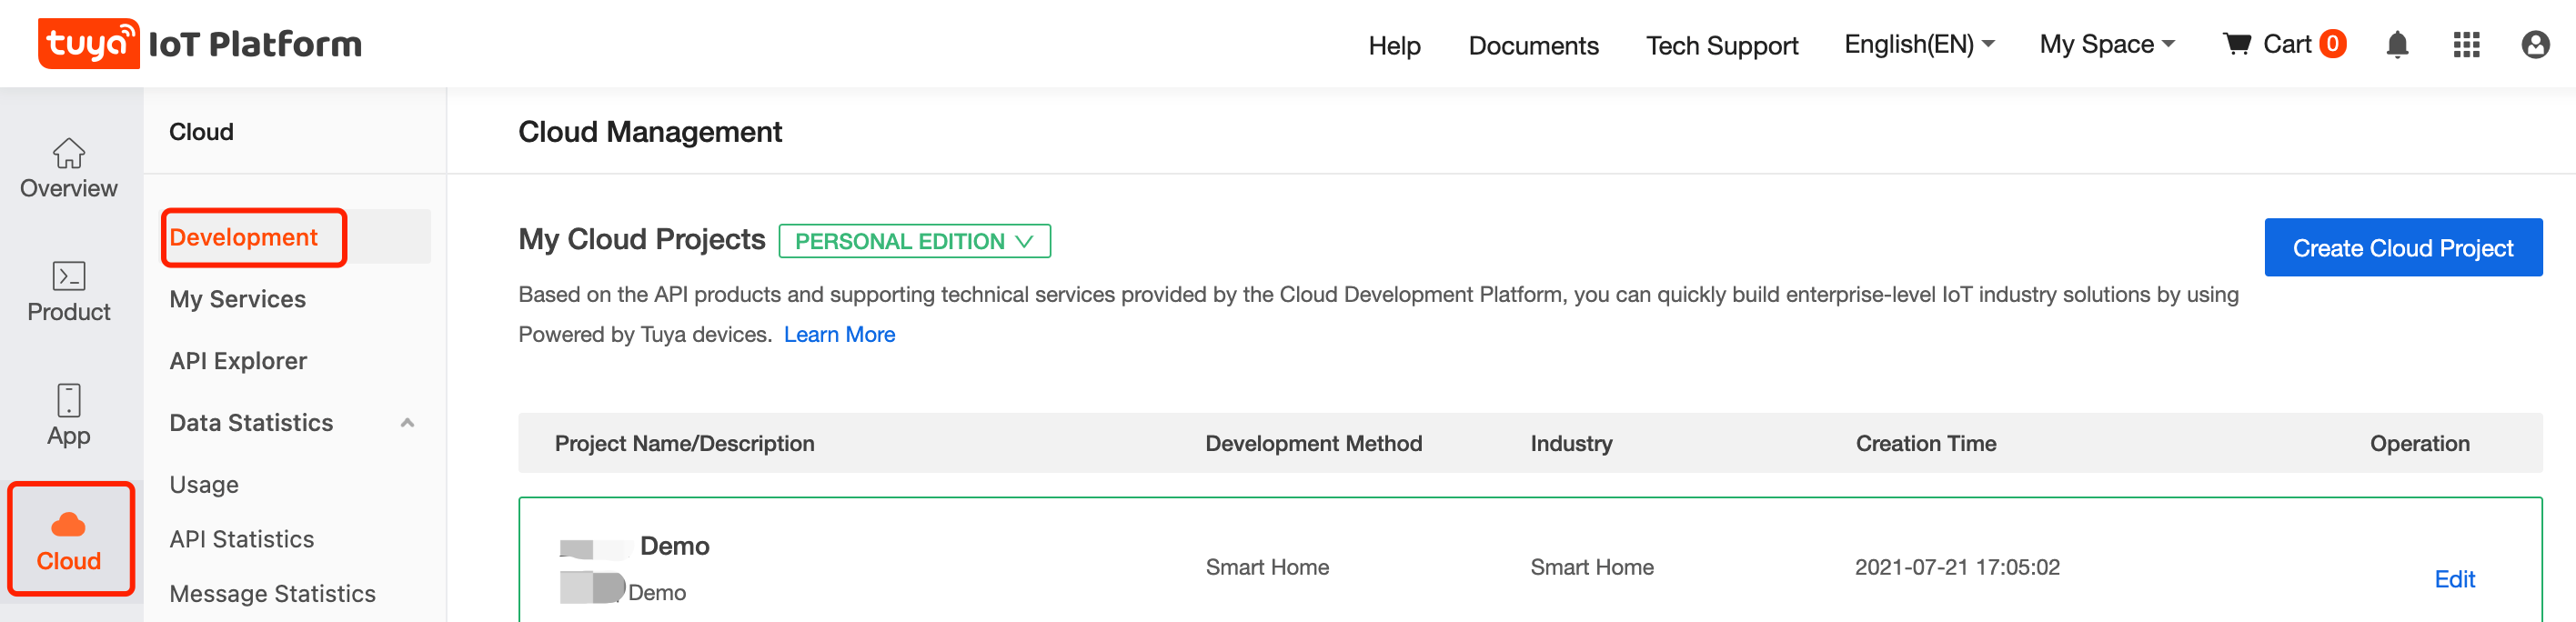
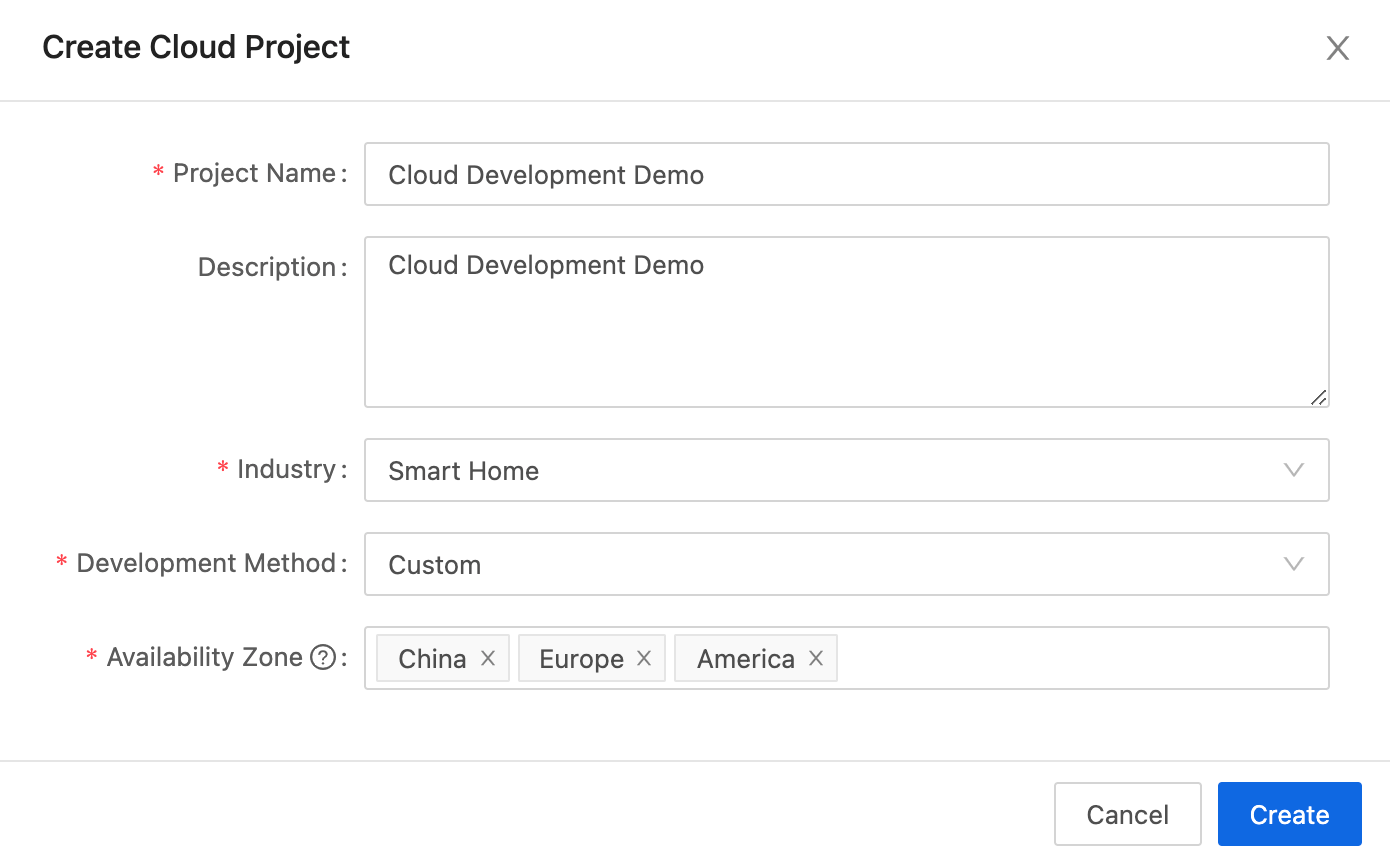
On the My Cloud Project page, click Create Cloud Project on the right side of the page.
In the Create Project dialog box, configure the project parameters and click Create.
- Project Name: The name of the custom project.
- Description: Customize the description of the project.
- Development method: For this example, select Custom Development.
- Service Industry: Customize the industry type of your project, which is convenient for later statistical analysis.
Availability Zone: Fill in the server address corresponding to your area. For detailed correspondence, please refer to Account Location and Correspondence of Availability Zone at the end of this post.
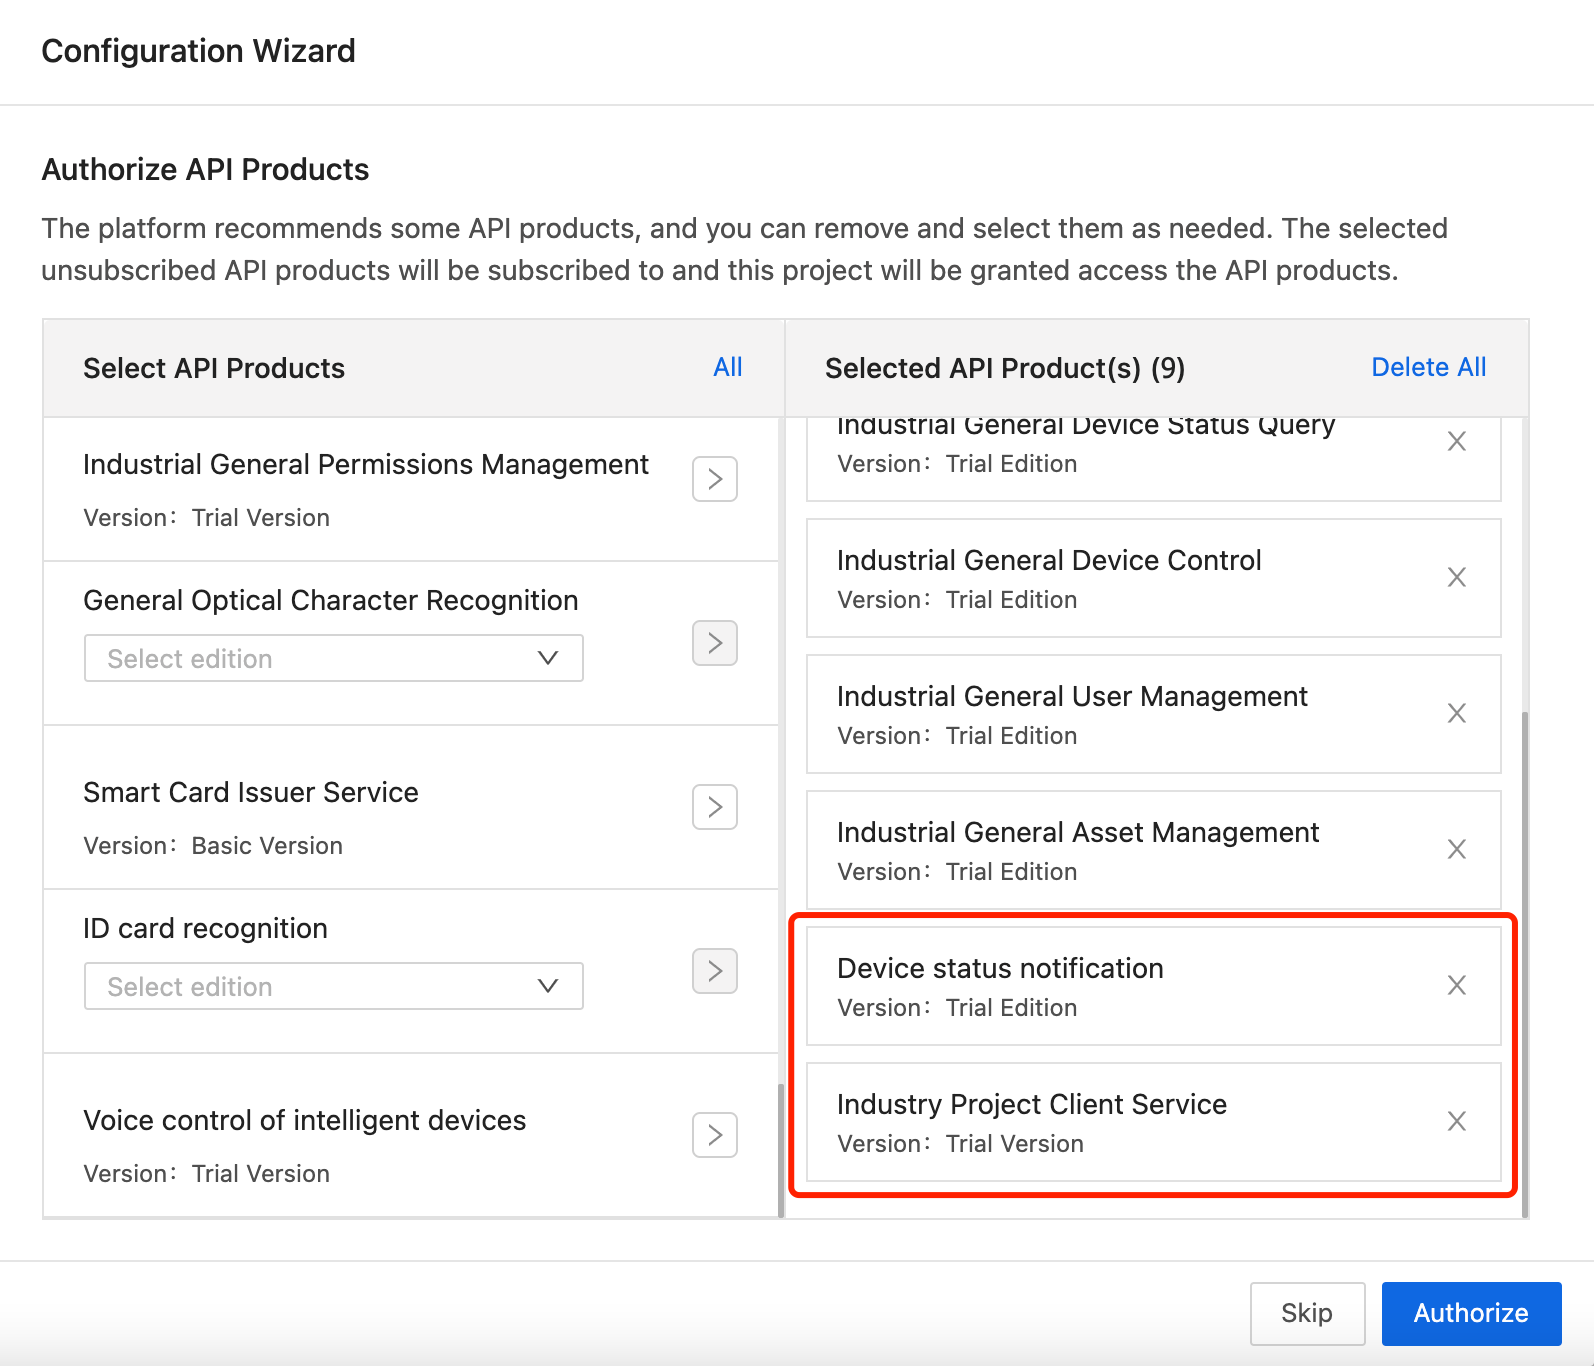
In Authorize API Products, in addition to the API service selected by default, you also need to select Device Status Notification and Industry Project Client Service API, and click Authorize.
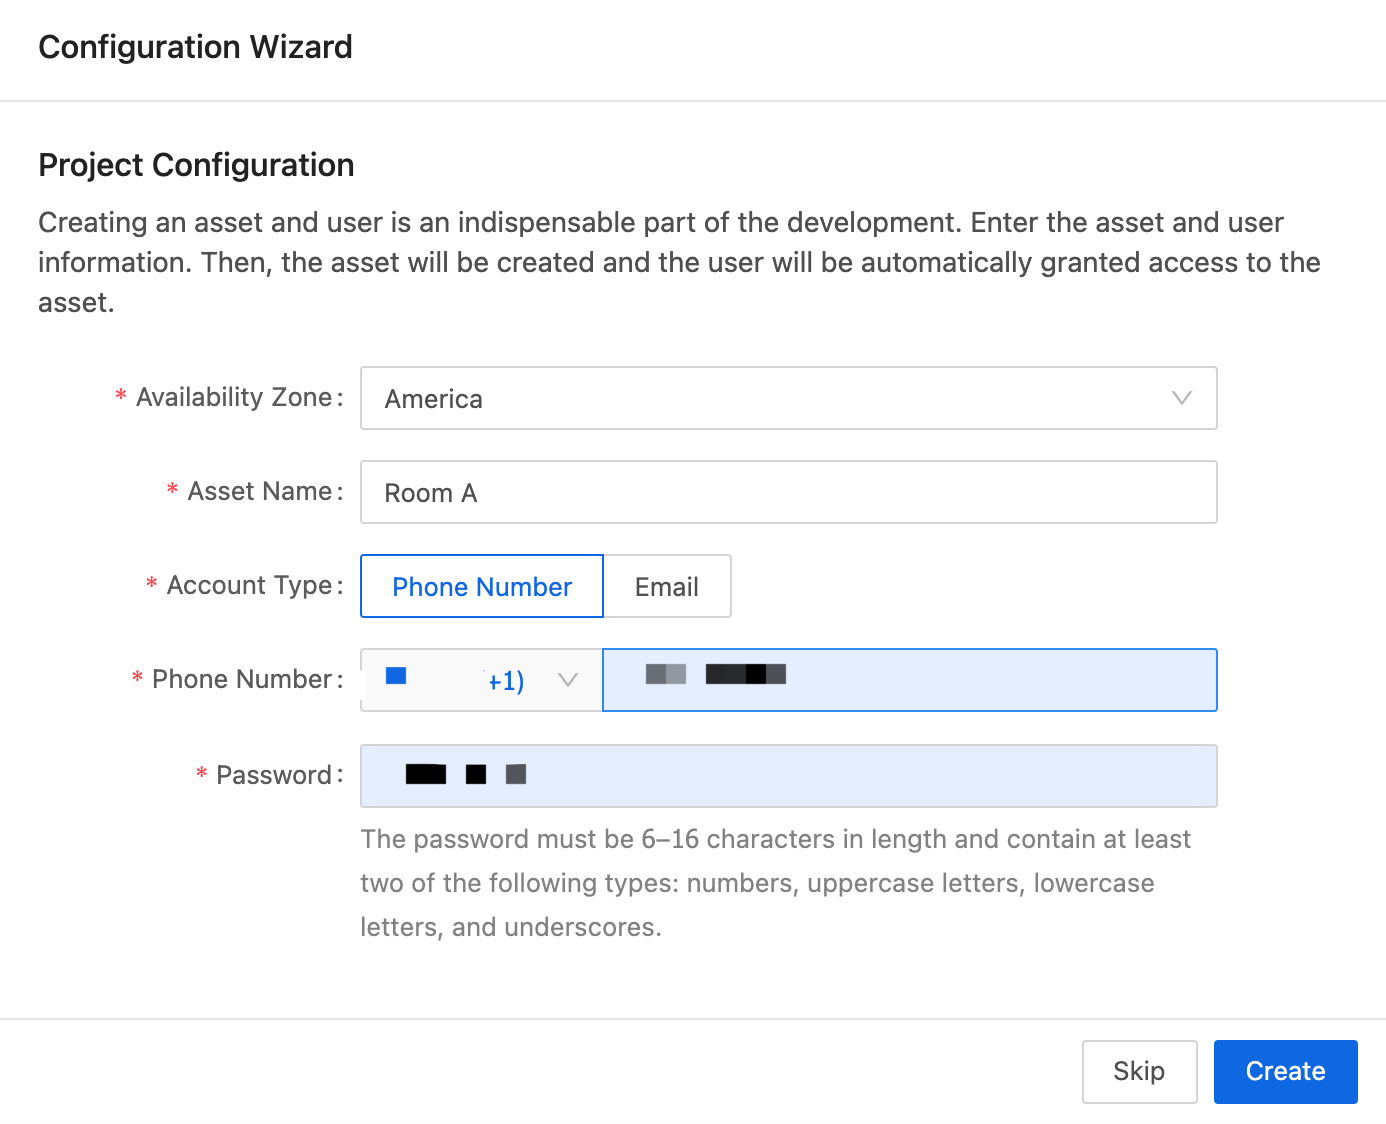
Create an initial asset and initial account, the initial asset will be automatically authorized to the initial account.
Note: Please keep in mind the account and password you configured. In the future, you will use IoT Device Management App It will be used when adding a device or using API to control a device.
Step 2: Obtain The Authorization keys
Go to the Overview page of the created project and get the Authorization Key used for API calls, namely Acccess ID and Access Secret.
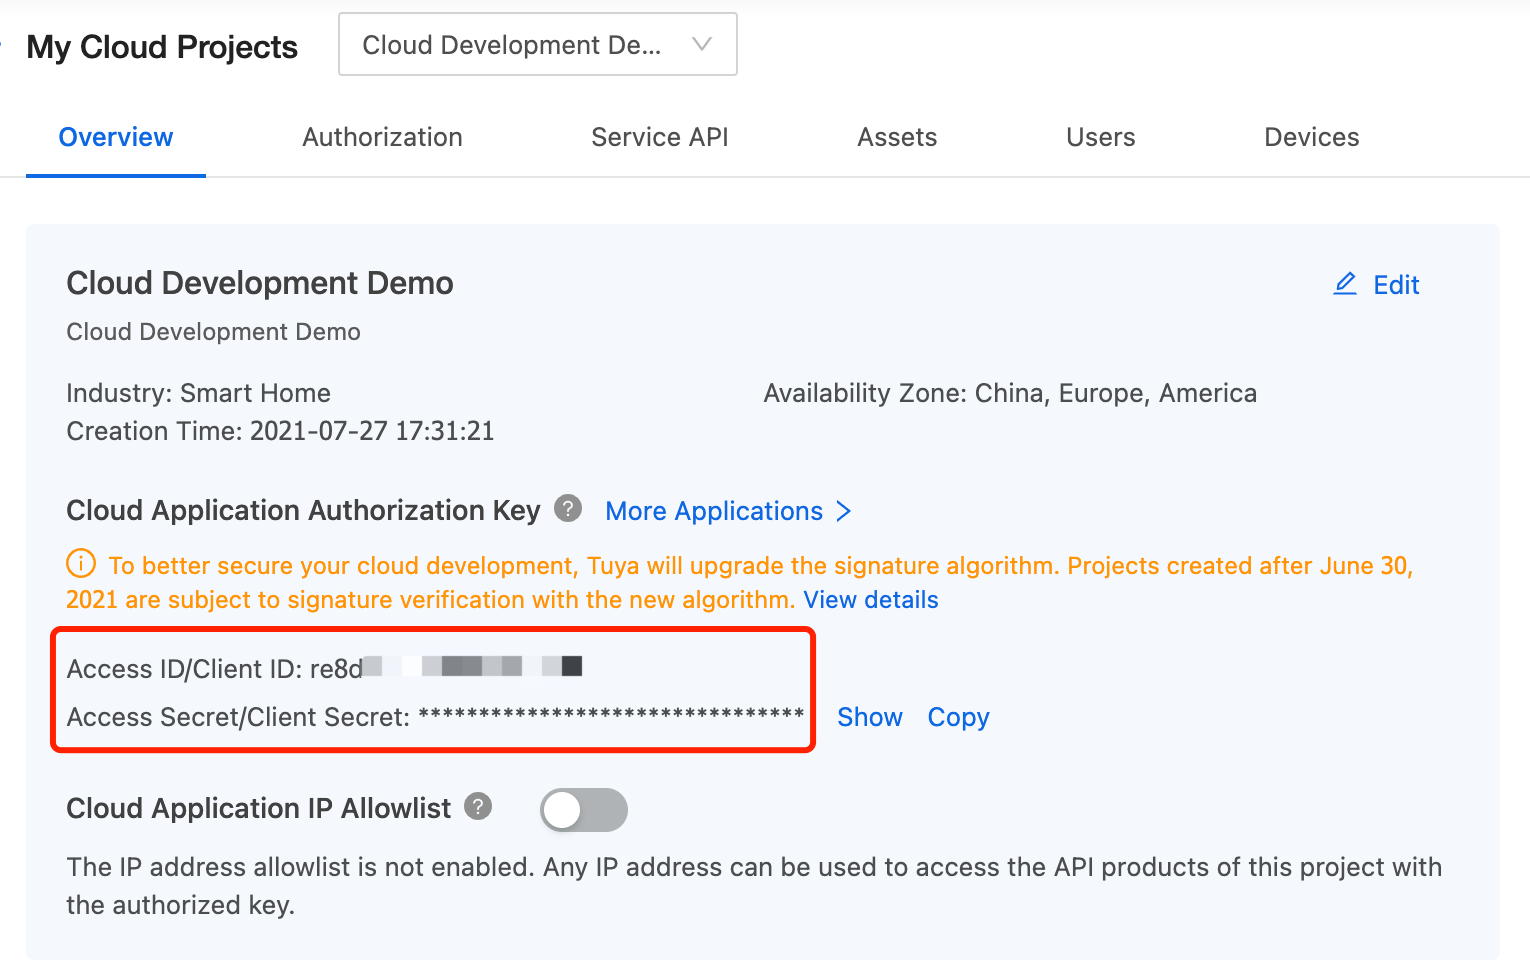
Note: if you are being asked to verify your phone and ID number (this is strictly for Mainland Chinese developer), change your country/region from your account settings. It's in the top right.
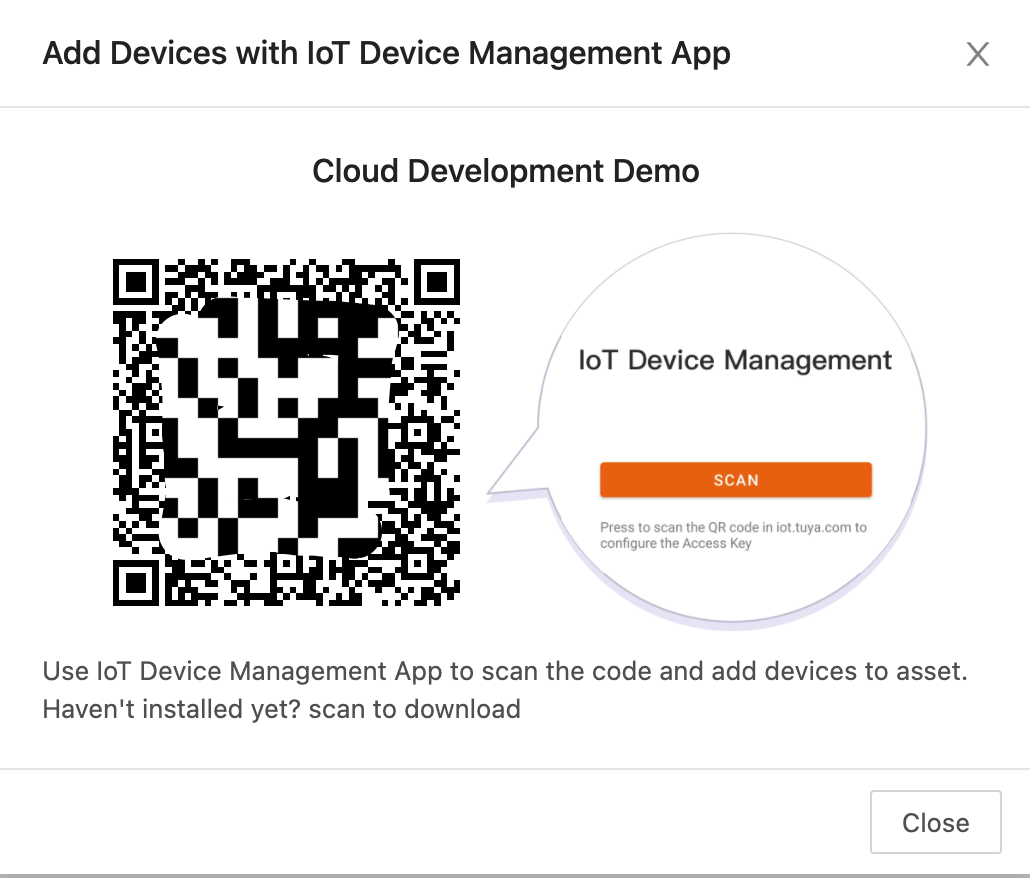
Step 3: Add Devices Using IoT Device Management App
Our purpose in this step is to add a smart device to the asset to allow API control. If you don’t have a Powered By Tuya device nearby, we provide you with a virtual device service. For how to use it, see Manage Virtual Devices.
Description: In addition to adding devices to assets, Tuya also provides a way to associate external application devices for you to choose, please refer to Manage Devices.
- Under the Device page, hover the mouse to support Add Device, and click IoT Device Management App to add a device.
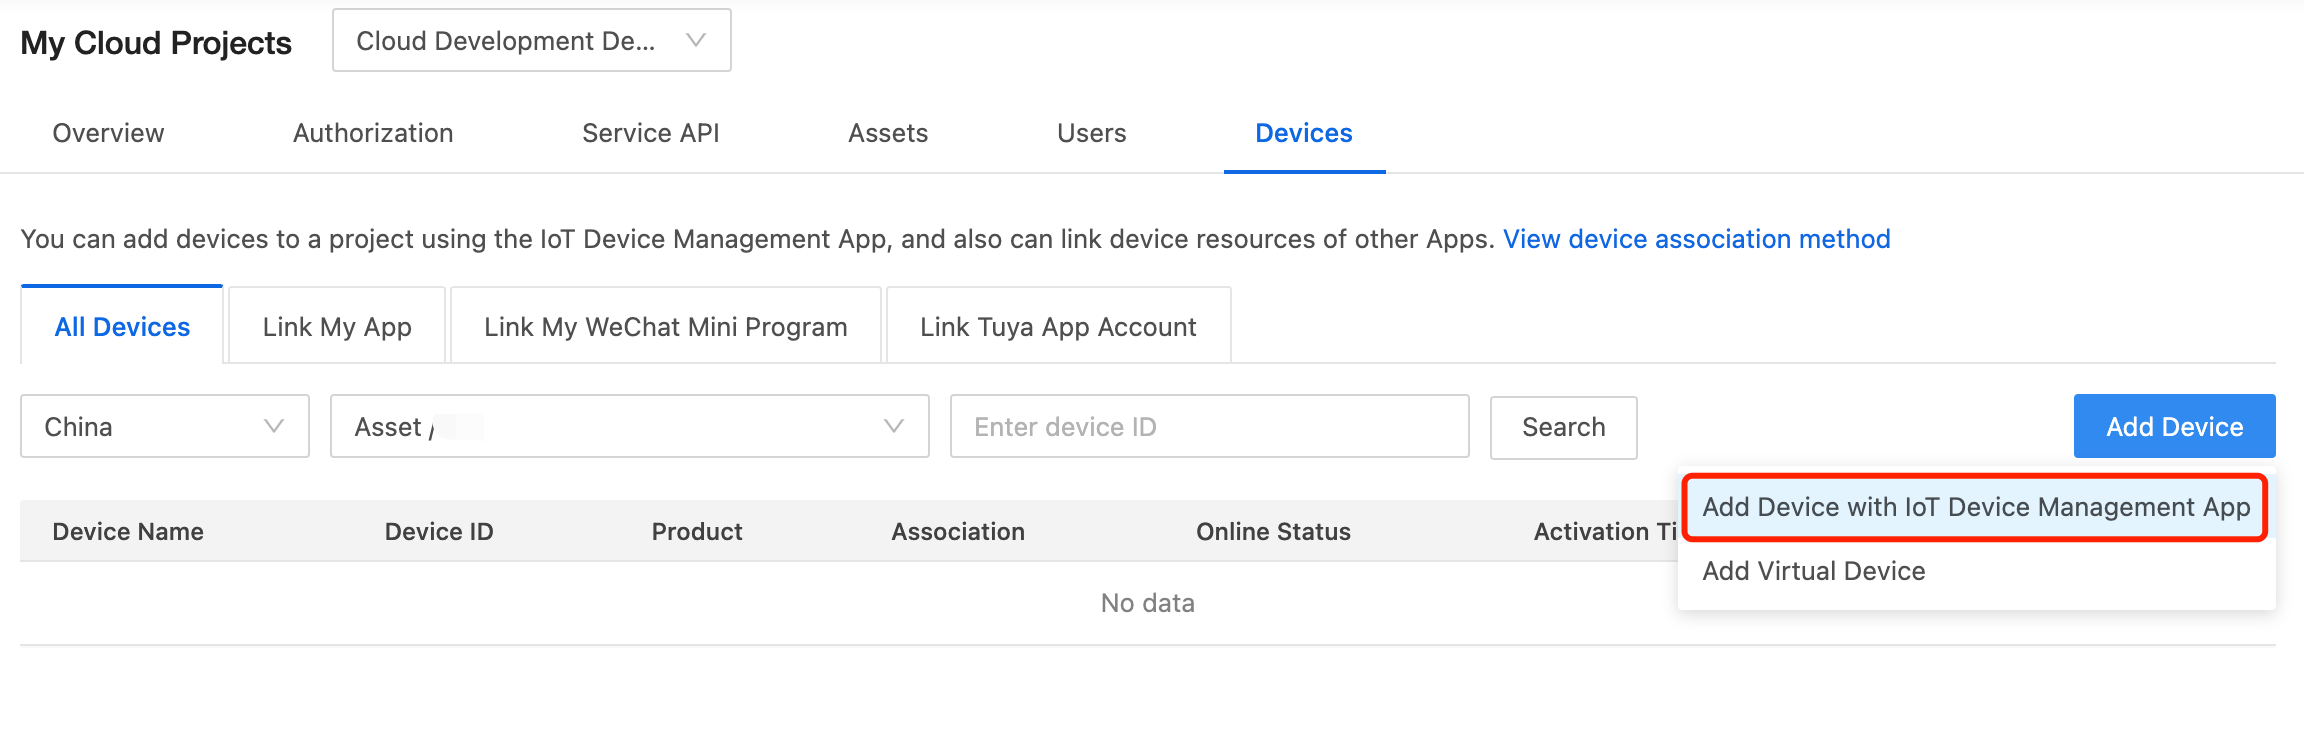
- Use the QR code of the project scanned by the IoT Device Management App.
- Log in to IoT Device Management using the initial account.

- On the Assets page, click the target asset name to enter the Assets tab.
- Click the Add symbol in the upper right corner of the asset list.
- In the pop-up box below, click the Pair Smart Device option.

- Add device. You can add devices in two ways: Add manually and Auto scan. For specific operations, please refer to Add Device.

Using virtual device
From the Cloud > Development > Devices, please select Add > Add Virtual Device. It will generate the virtual device, along with Device ID that we will use later.
In this post, we are using Lighting > Light Strip > RGB Light Strip, then click Add Virtual Device.
Step 4: Device Control & Status Monitoring
Install tuya-iot-python-sdk
This step is based on Tuya-iot-python-sdk. tuya-iot-python-sdk integrates the developer's cloud connection and processing process during the Tuya cloud docking (OpenAPI or message subscription) project, allowing developers to focus on their own business logic just like local development. The installation command is as follows.
$ pip install tuya-iot-py-sdk
Note: I recommend you to work on this project using isolated environment like virtualenv or similar things.
If you have not install virtualenv, you can use this command:
$ sudo pip install virtualenv
And next, we are going to create the isolated environment. Use this command from the root directory of your project.
$ virtualenv .virtualenv
After the virtual environment is successfully created, use this command to activate the isolated environment using this command:
$ source .virtualenv/bin/activate
Get The Configuration Info
- ACCESS_ID and ACCESS_KEY: the authorization key obtained through the second step.
- ENDPOINT: The access address of the cloud development project, please refer to Endpoints.
- USERNAME and PASSWORD: [Initial account] (#useraccount) and password configured when the project was created.
- DEVICE_ID: ID of the associated device, refer to View device .
Create a file called .env in your root project directory, and fill the .env file with these information.
# Cloud project authorization info
ACCESS_ID ='YOUR ACCESS ID'
ACCESS_KEY ='YOUR ACCESS KEY'

# Select an endpoint base on your project availability zone
# For more info: https://developer.tuya.com/en/docs/iot/api-request?id=Ka4a8uuo1j4t4
ENDPOINT = "https://openapi.tuyacn.com"

# Project configuration
USERNAME ='YOUR EMAIL ADDRESS'
PASSWORD ='YOUR PASSWORD'

DEVICE_ID ='YOUR DEVICE ID'
Important note: if you are using version control like Git, please never commit your actual .env file as it may publish your credentials
Also, do not forget to install dotenv so we can access the environment variables from the .env file. To install dotenv, you can use this command:
$ pip install python-dotenv
So we can call the environment variables using this code:
from dotenv import load_dotenv
load_dotenv()

import os

print(os.environ.get('YOUR_ENVIRONMENT_VARIABLE'))
Device Control
This code realizes the function of switching the light strip switch after inputting any information on the keyboard.
Note: The device controlled by this program is a light strip, and the standard instruction set for controlling its switch is switch_led. If you are other equipment, you need to modify the code after querying the standard instruction set.
Create a new file called app.py in your root project directory, and write this piece of code down:
from dotenv import load_dotenv
load_dotenv()

import os

from tuya_iot import TuyaOpenAPI, tuya_logger

ENDPOINT = os.environ.get('ENDPOINT')
ACCESS_ID = os.environ.get('ACCESS_ID')
ACCESS_KEY = os.environ.get('ACCESS_KEY')
USERNAME = os.environ.get('USERNAME')
PASSWORD = os.environ.get('PASSWORD')
DEVICE_ID = os.environ.get('DEVICE_ID')

# Initialization of tuya openapi
openapi = TuyaOpenAPI(ENDPOINT, ACCESS_ID, ACCESS_KEY)
openapi.login(USERNAME, PASSWORD)

# # Uncomment the following lines to see logs.
import logging
tuya_logger.setLevel(logging.DEBUG)

flag = True
while True:
    input('Hit Enter to toggle light switch.')
    flag = not flag
    commands = {'commands': [{'code':'switch_led','value': flag}]}
    openapi.post('/v1.0/iot-03/devices/{}/commands'.format(DEVICE_ID), commands)
To execute the app.py, please use this command:
$ python app.py
Depends on your internet connection (which usually do not take that long for the short code above), here is the examples of returned results:
Hit Enter to toggle light switch.
[2021-07-27 21:40:35,175] [tuya-openapi] Request: method = POST, url = https://openapi.tuyacn.com/v1.0/iot-03/devices/6856054084f3eb62e90e/commands, params = None, body = {'commands': [{'code':'switch_led','value': False}]}, headers = {'client_id':'x4xgaucaarz0pueddr90','sign': '4C6DB30C3A0D3FD287C906F2A7B1CB8100B31E239CA's ':'HMAC-SHA256','access_token': '73f736bbf923b5ff84fed8ad8ff3c940','t': '1627393235175','lang':'en'}
[2021-07-27 21:40:35,281] [tuya-openapi] Response: {
  "result": true,
  "success": true,
  "t": 1627393317042
}
Device Status Monitoring
Note: this code below requires you to have the actual Powered By Tuya device ID. If you are using virtual device ID, it will most likely fail to send the request.
This code implements the monitoring of device event information under a user, including device online, offline, status reporting, etc. The device status notification service takes the form of MQTT messages to actively notify the terminal application of changes in device status, device alarm messages and other content in real time, eliminating the need for the terminal application to frequently query the device status.
Description: This function needs to activate Device status notification Service API
Create a new file called monitoring.py in your root project directory, and write down this code:
from dotenv import load_dotenv
load_dotenv()

import os

from tuya_iot import TuyaOpenAPI, TuyaOpenMQ, tuya_logger

ENDPOINT = os.environ.get('ENDPOINT')
ACCESS_ID = os.environ.get('ACCESS_ID')
ACCESS_KEY = os.environ.get('ACCESS_KEY')
USERNAME = os.environ.get('USERNAME')
PASSWORD = os.environ.get('PASSWORD')
DEVICE_ID = os.environ.get('DEVICE_ID') # Actual Powered By Tuya Device ID

import logging
tuya_logger.setLevel(logging.DEBUG)

# Initialization of tuya openapi
openapi = TuyaOpenAPI(ENDPOINT, ACCESS_ID, ACCESS_KEY)
openapi.login(USERNAME, PASSWORD)

# Receive device message
def on_message(msg):
    print("on_message: %s"% msg)

openmq = TuyaOpenMQ(openapi)
openmq.start()
openmq.add_message_listener(on_message)
To execute the monitoring.py, please use this command:
$ python monitoring.py
Depends on your internet connection (which usually do not take that long for the short code above), here is the examples of returned results:
[2021-07-27 10: 37: 28,087] [tuya-openmq] payload-> b '{ "data": "AAAADN2q / ueLzZE78ubHsQ9Nk + iUBd7QOfPyB78P2Fspm2rMMHYymWYVnZL1m0wM0oZ6cFk / kpPaGVDXsAIlrIIaM6k6wWWAezW7SJLF6gERzS0fivv / GQ24QYahT3UvadDx4v45sWuyssg33sX1uC0PFP9kvghc8o9Q1QELGFgmc7JPb0FQ4HDxW98DJPCeIgYTWmmz + BHoaDbH6iOV0SEcsi6vlFGtYQtj7BB / t / O / g0bTT9RdnmLbGxllJjedwBA2c6XPKNv7HHrouF7LfTDmXwFHml5q6U54cMWI", "protocol" :4,"pv":"2.0","sign":"65f7dcb596587db3f7d9374e93484e7eb44d938f287fae4dcb3eaf721cfbee66","t":1627353446615}'
[2021-07-27 10:37:28,091] [tuya-openmq] on_message: {'data': {'dataId': '356c93f2-3929-4a8f-ae28-ae5607efc7ad','devId':'***1626937310799 ','productKey':'yju2******ujr5zx','status': [{'code':'switch_led','t': '1627353446615','value': False, '20': False }]},'protocol': 4,'pv': '2.0','sign': '65f7dcb59************74e93484e7************fae4dcb3e ******fbee66','t': 1627353446615}
Summary
IoT development is not that hard, right? With your current Python knowledge, you are already able to develop and control IoT device.
This post describes how to use the Python SDK based on the Tuya Cloud development platform to call device-related APIs to control a smart device and monitor device information. Due to the strict uniformity of the Powered By Tuya device system, you can extend this control method to all Powered By Tuya devices. Allows you to quickly develop SaaS applications based on smart devices without considering device differences.
If you want the code, it is available in my Github repository here:
The featured image in this post is edited using my Spotify Photo Filter which you can use for free from my Mini Product.