Detect Toxic Comments in Your App Using Toxicity Space
How Toxicity Space can be used to enhance the toxic commentary detection in your application
The comment section has been an interesting part of many applications or websites since long ago. It enables the users to express their ideas freely. However, without moderation, the comment section will become unhealthy and will turn out to be a war place.
But what if we don't have a human moderator?
Before you continue to read this post, I should warn you that there are a lot of toxic commentaries included in this post for example. I by no means support the use of toxic commentary in the internet conversation.
Toxic Comment Detection
Toxic comment detection is a popular research topic among the Computer Scientists for a long time, and it falls under Natural Language Processing field. Natural Language Processing is the ability of a computer program to understand human language as it is spoken and written (referred to as natural language). Natural Language Processing is a component of Artificial Intelligence (AI).
Natural Language Processing has existed for more than 50 years and has roots in the field of linguistics. It has a variety of real-world applications in a number of fields, including medical research, search engines, and business intelligence.
Introducing Toxicity Space
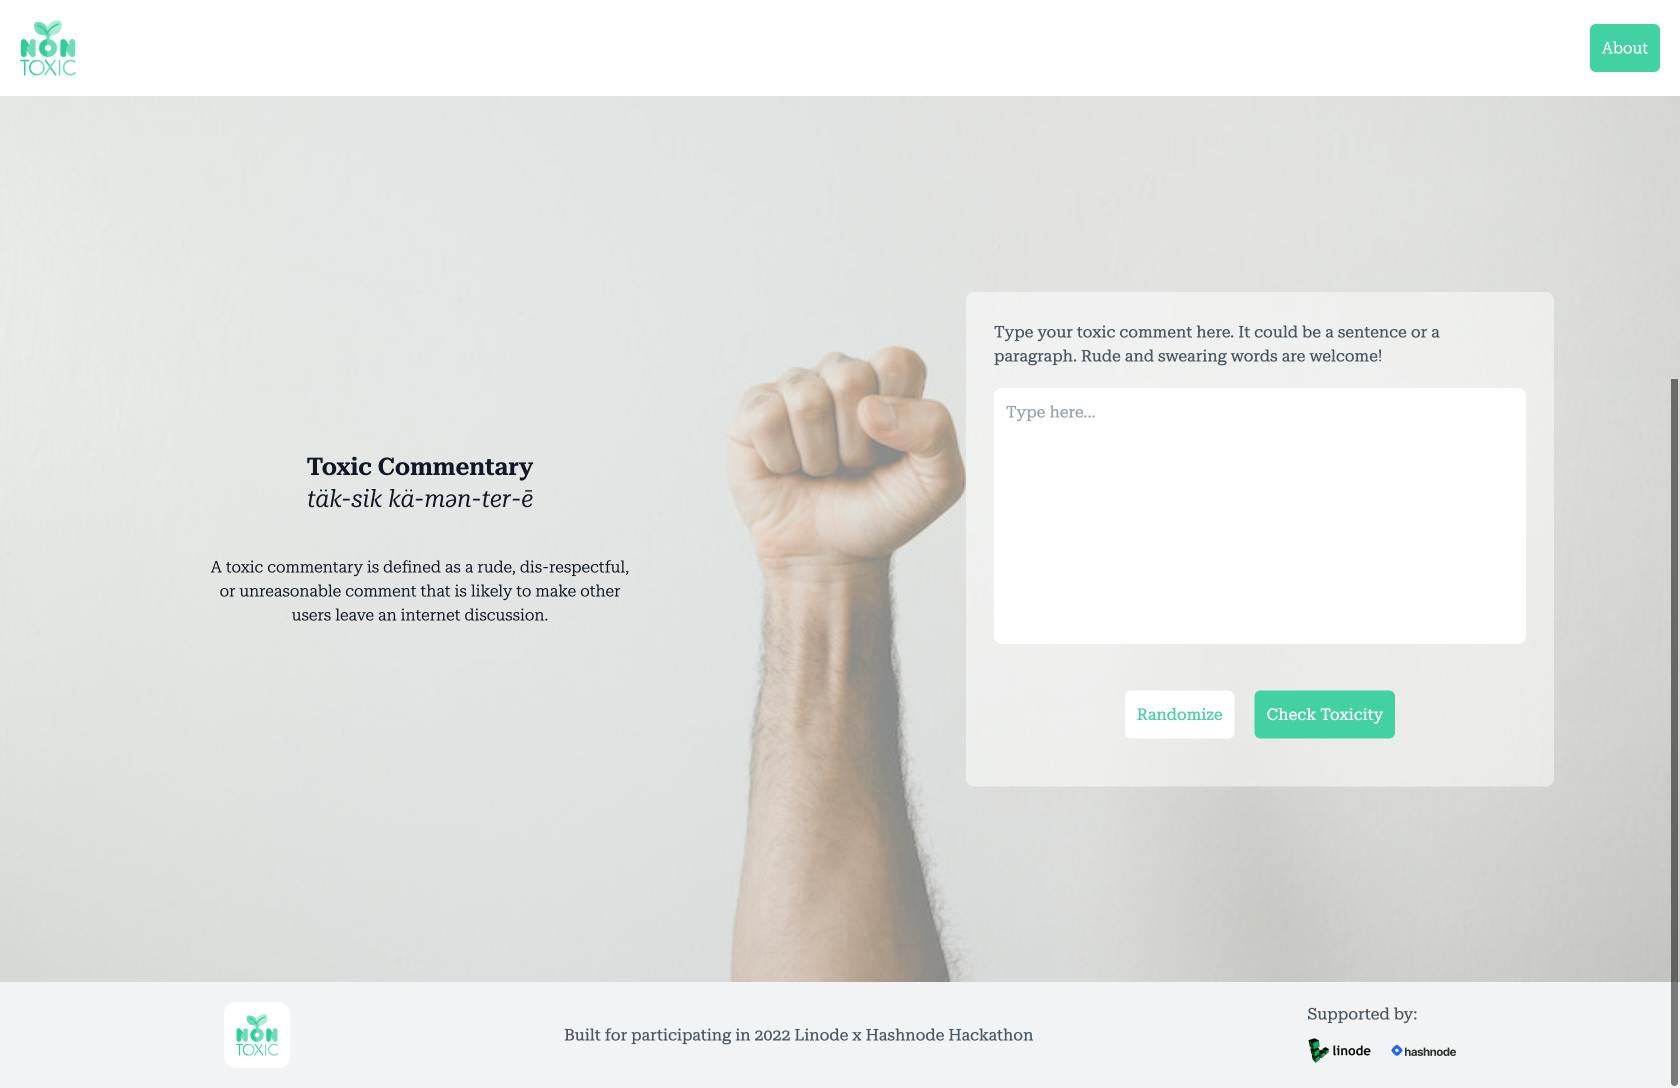
Toxicity Space (which can be accessed at toxicity.space) is an application that is being used to detect toxic commentary that is deployed on Linode. Linode is a cloud hosting platform that services over 400,000 customers including The Onion, Creative Commons, and WP Engine. The Linode Manager allows customers to create, manage, and deploy virtual servers and services through a web interface.
The core part of this application is the API, which is built using ExpressJS, while the user interfaces part is for demo-ing the API. You can use the API freely, and you can include it in your own app. But just be aware that the current state of the API is still in Alpha state, and not production-ready.

We surely want to detect and remove this kind of commentary from our platform, right?
Why I Build It?
When I was a Master's Degree student in Universitas Gadjah Mada back in 2015, my main research topic was Natural Language Processing. For me, it is fun to make the computer able to understand what we speak and write. On the other hand, it is not an easy task to make the computer understands the human language. It was very challenging, but it was good ol' days for sure.
And today, the Linode x Hashnode Hackathon gives me an itch, that I should refresh my memories and build any tool that is related to Natural Language Processing to scratch my itches.
Since Toxicity Space is not a product that is meant for end-user (I mean, why would an end-user use this application, right?), I build this to help other Developers enhance their applications with toxic commentary detection. The goal of this application is to become the third-party service for their app, and after that, it is up to them whether to delete the comments, flag the comments, or anything they want.

Another example of a toxic comment.
Text Classification: A Theory
Before we get deeper into the technical section, it is better for us to know how a text classification works, behind the scene.
Text classification is the activity of labeling natural language texts with relevant categories from a pre-defined set. In Layman's terms, text classification is a process of extracting generic tags from unstructured text. These generic tags come from a set of pre-defined categories.
Based on the description above, text classification can be described as a process to label/flag/categorize an input text, based on the computer's trained intelligence (and that is why text classification becomes a part of Artificial Intelligence).
But how does the computer trained?
It is mentioned several times in the description that we are using pre-defined set. It means that we provide a list of text (called training data), then labeled it as toxic or not, and let the computer reads the training data.
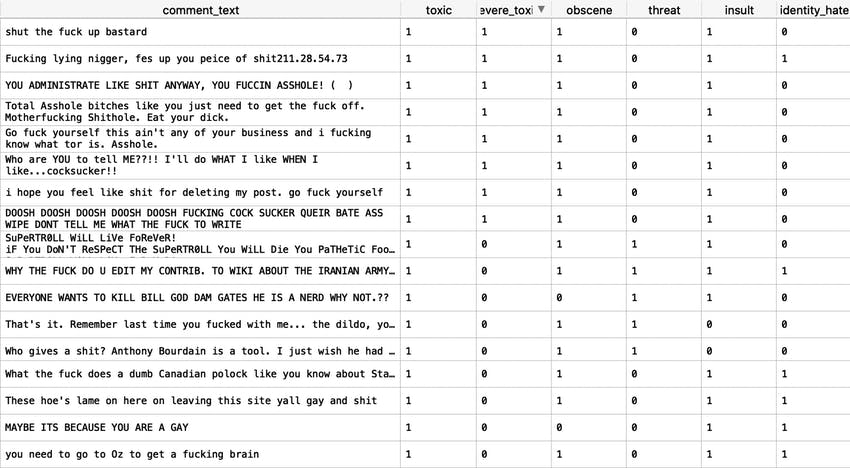 Sample of training data.
After we successfully train the computer, then we can use the computer's ability to detect or classify the input text, based on the pre-defined set that we provided before.
Just be aware, that the quality of the computer's AI will heavily depend on how we provide and pre-process the data set. A badly-processed dataset will result in the wrong or low-quality classification. But that's for another post. That is why this field is so challenging.
Building The Classifier API
I already mentioned above that the core part of this application is the API. The API can be used to receive the input text, classify the text, and return the classification result. For the hard-core developers, it is possible to build their own classification engine. But it takes a lot of effort and time (that would be even longer than this hackathon timeline) to build a good classifier engine.
Fortunately, there are ready-to-use libraries/platforms that can be used for this specific task. And one of the most popular platforms is TensorFlow. TensorFlow is an end-to-end open source platform for machine learning. It has a comprehensive, flexible ecosystem of tools, libraries, and community resources that lets researchers push the state-of-the-art in ML and developers easily build and deploy ML-powered applications. And we are using TensorFlow for this application.
But since this is not a tutorial or how-to post, I highly recommend you to read TensorFlow tutorial posts on Hashnode.
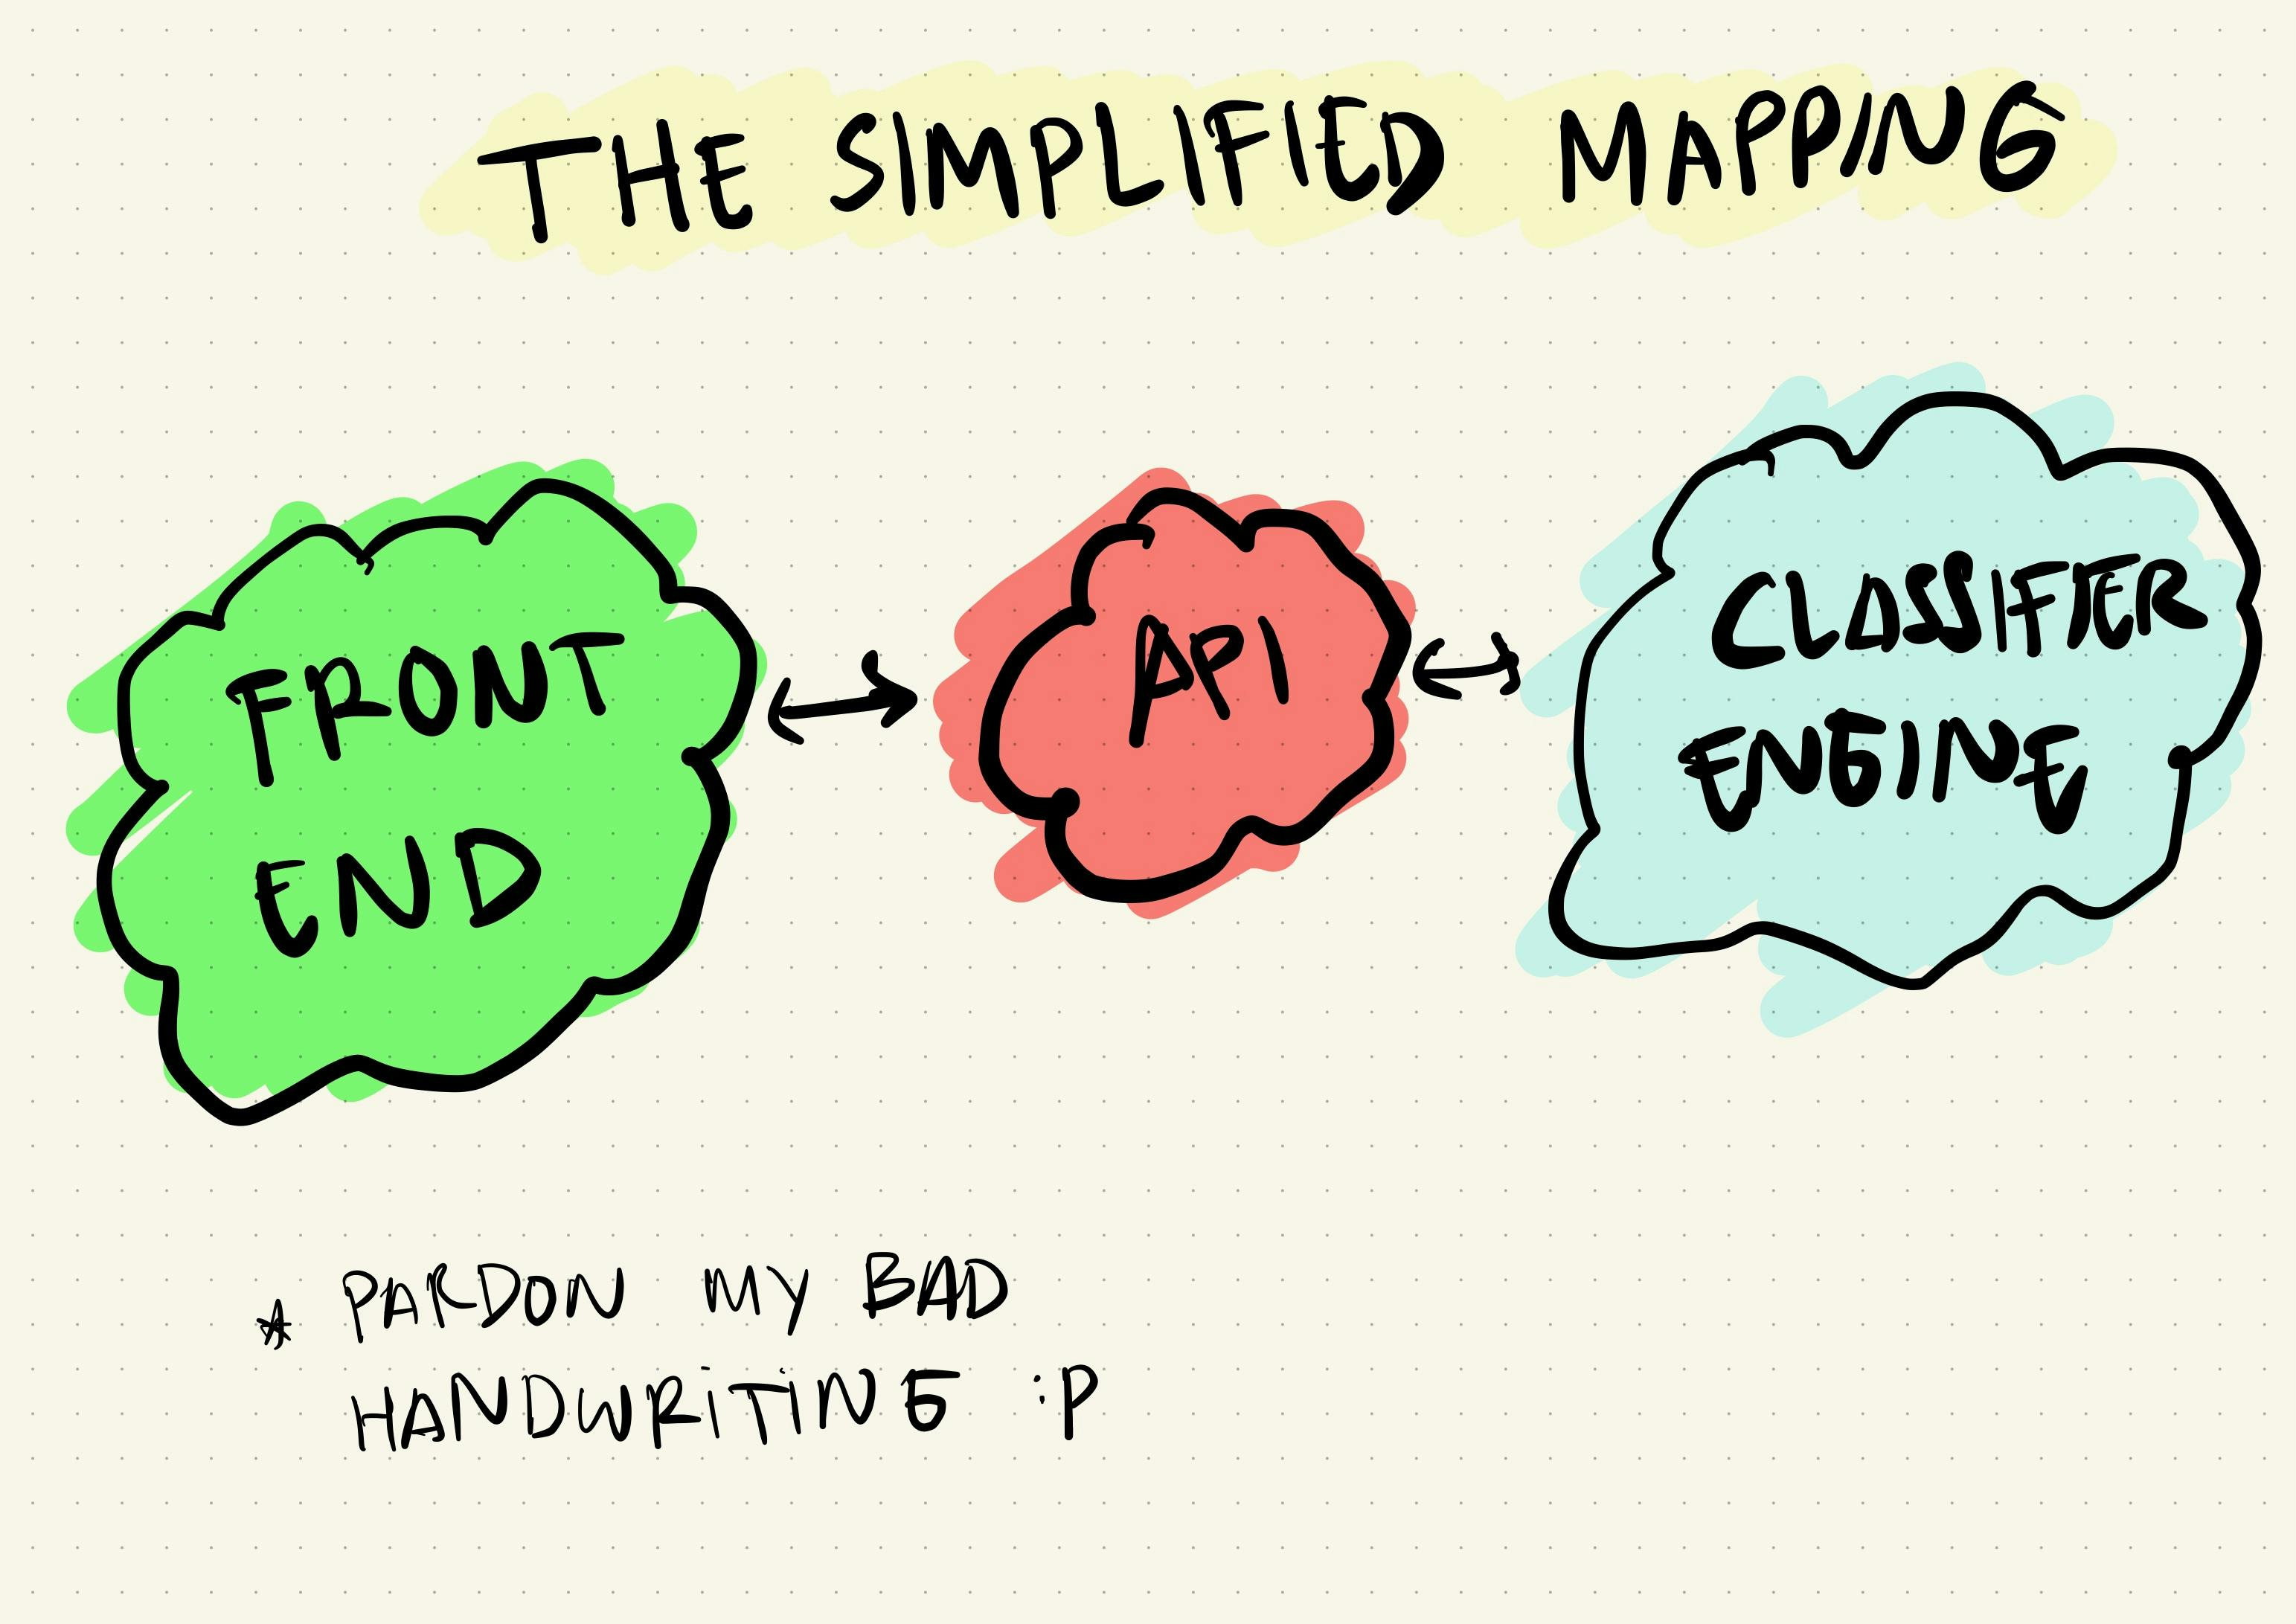
These are the main components of the Toxicity Space. You can use your own app to replace the Front-End and directly consume the API, which will be explained later in this post.
Building The Front-End
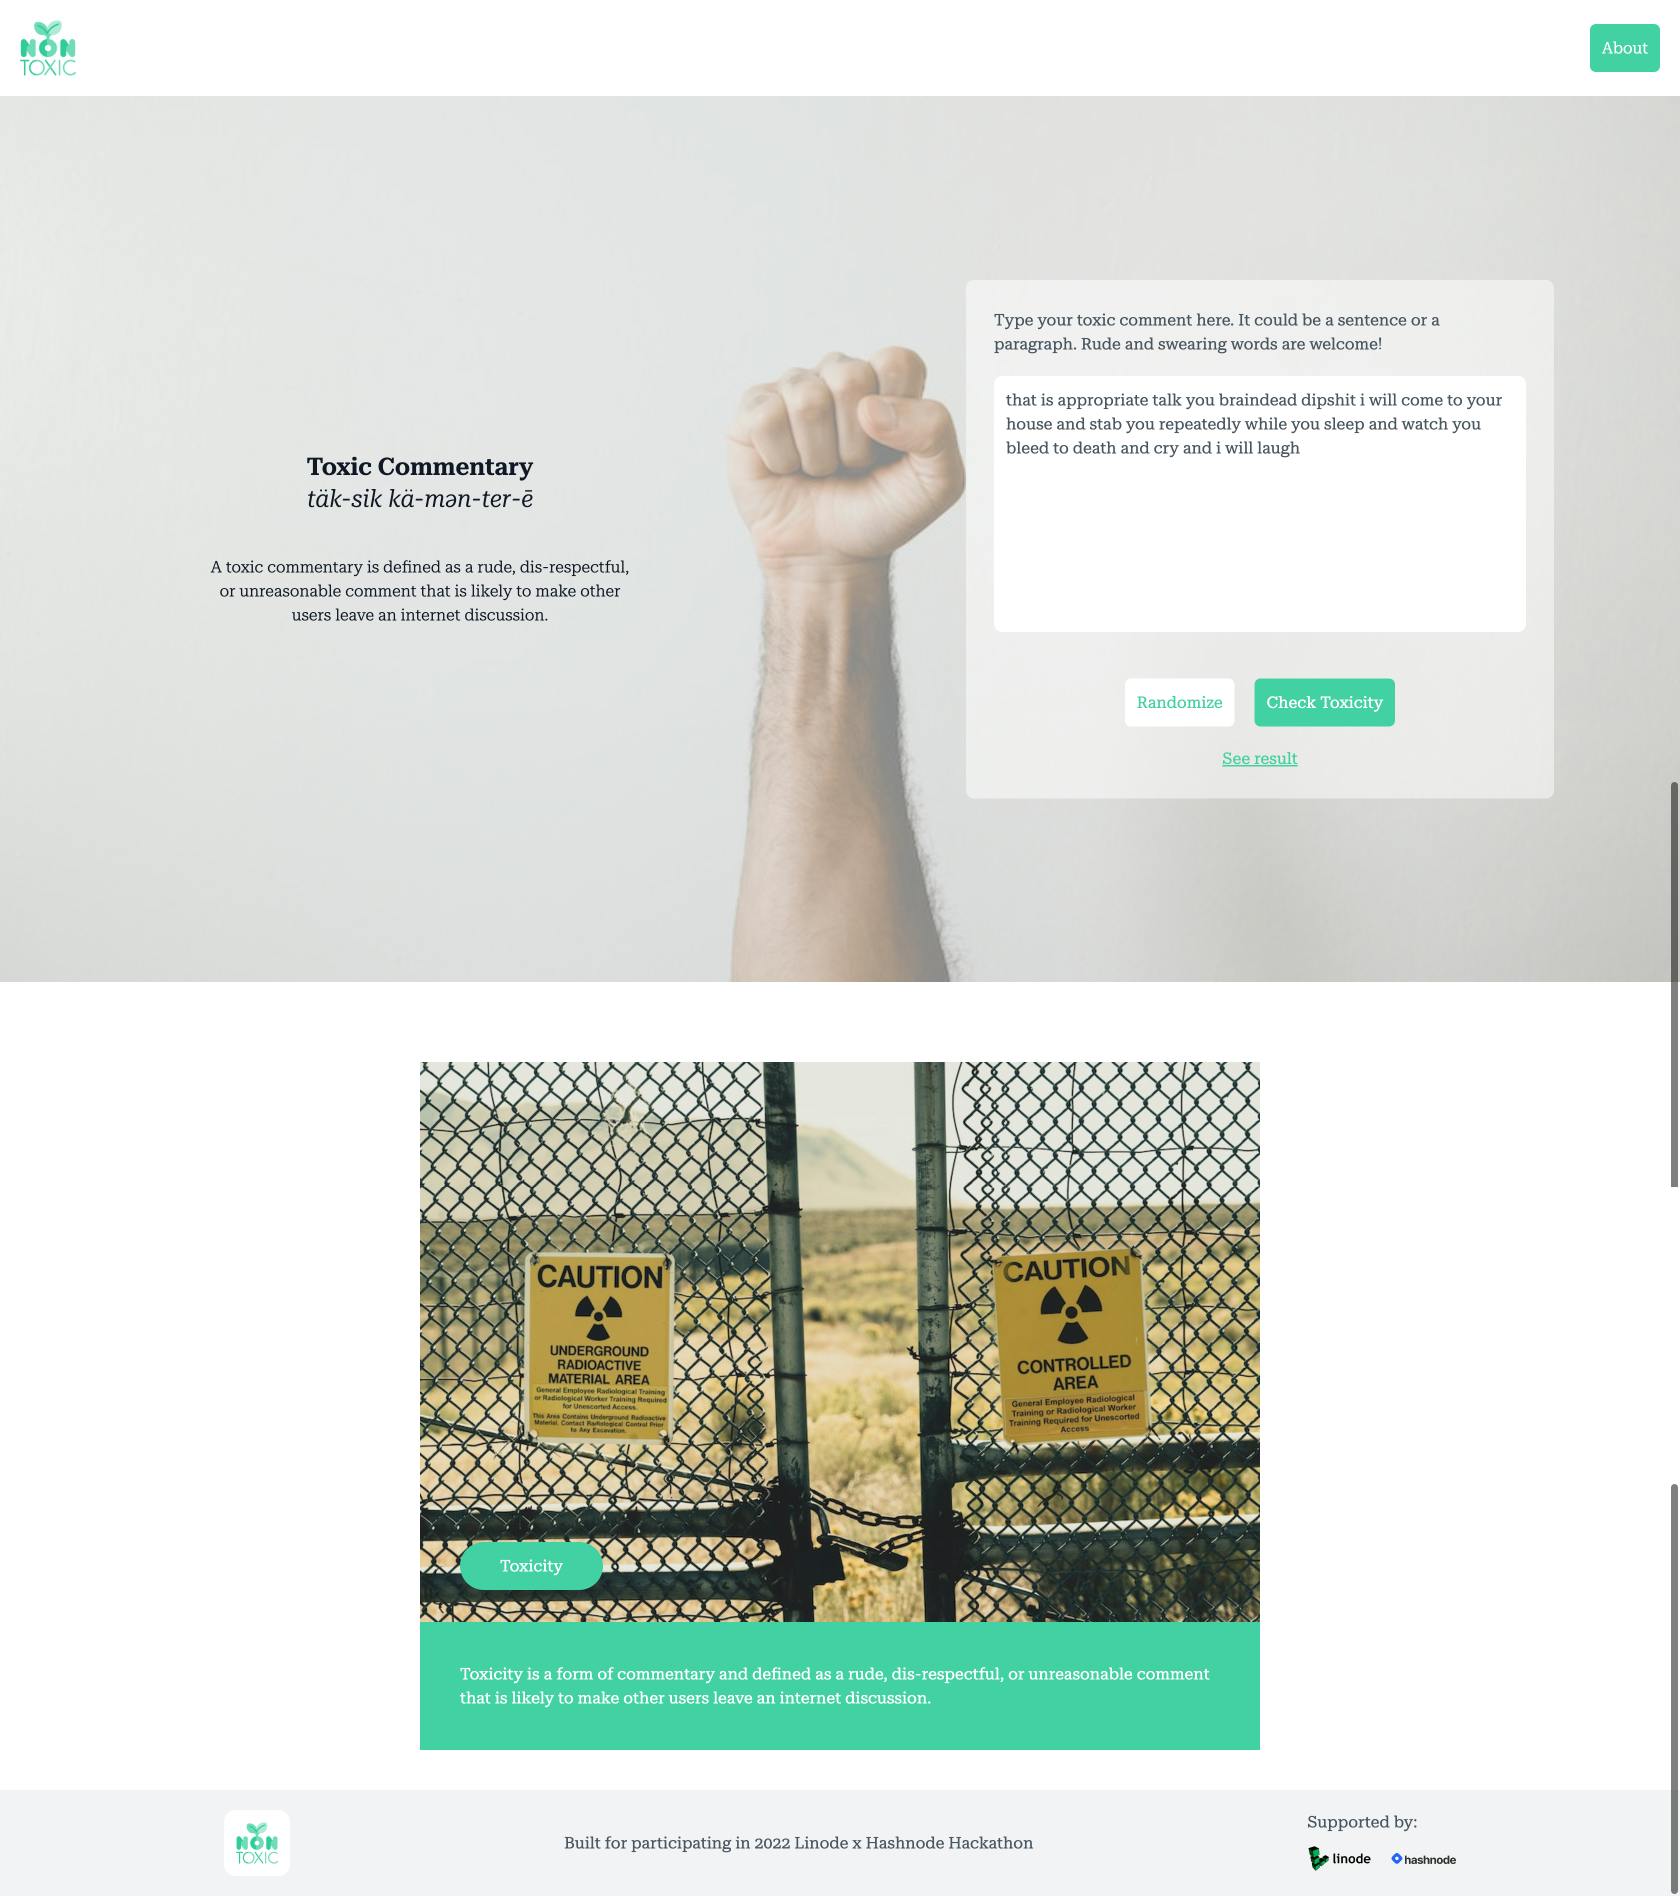
The Front-End part of this application is just pure for information and demo-ing the API. I build the Front-End with nothing but ReactJS + TailwindCSS. These are my favorite go-to frameworks to build any Front-End application. The Front-End will literally capture the user's input, send it to the API, and display the result.
If you want to use the live application, visit toxicity.space and you'll see a text area field that you can use to type your own hate or toxic comment, and then press the 'Check Toxicity' button underneath. If you run out of ideas, you can press the 'Randomize' button to show toxic commentary examples, then press the 'Check Toxicity' button.
Here's a screenshot of the front-end in action (the UI/UX design might be changed later).
Deploying on Linode
Deploying this application in Linode requires an intermediate Linux command line administration knowledge since you will deploy a Linux cluster, and manage it using the terminal. Also, you need to prepare your credit card if you want to use Linode's service. Fortunately, Linode provides $100 credit if you want to use their services.
Both the Front-End and the Back-End of this project are deployed in Linode. I'm really happy to be able to manage a Linux cluster one more time. It reminds me of those good ol' days. Thanks, Linode!
Here's my cluster's specification on Linode for this project:
| Items | Specification |
| OS | Debian 11 (Bullseye) |
| CPU | 1 Core |
| GPU | N/A |
| Memory | 4GB |
| Storage | 25GB |
| Cost | $5/month (with the free credit, the cluster will be live for 20 months) |
And after your cluster is deployed, you need to install these programs (in no particular order):
| Program Name | Purpose |
git | Interact with your Github repository |
nvm | All your node applications will need this installed |
openssh | You will use SSH to manage your cluster |
screen | So your command line application will not be stopped running after you detach the SSH session |
certbot | Build your own HTTPS certificate, so you can access your URL using https://..... |
nginx | Advanced load balancer, web service, and reverse proxy |
ufw | The guardian angel of your cluster |
After the Linode's part has been configured, you will be able to run and access your application using a specific IP address. Yes, IP address, and it means that you need one more step if you want to access your application using your own domain.
Connect Your Domain To Linode
If you haven't bought any domain for your project, I highly recommend you to buy a domain so your users will easily remember your website (it looks cool, tho! And a part of your branding). You can buy a domain from your own favorite domain registrar, and then you can follow this guide to configure your DNS in order to connect your domain to Linode. It's simple and easy to understand.
How Do You Use The Toxicity Space API?
I've talked a lot about how this project is built. Now it's your turn to use this application.
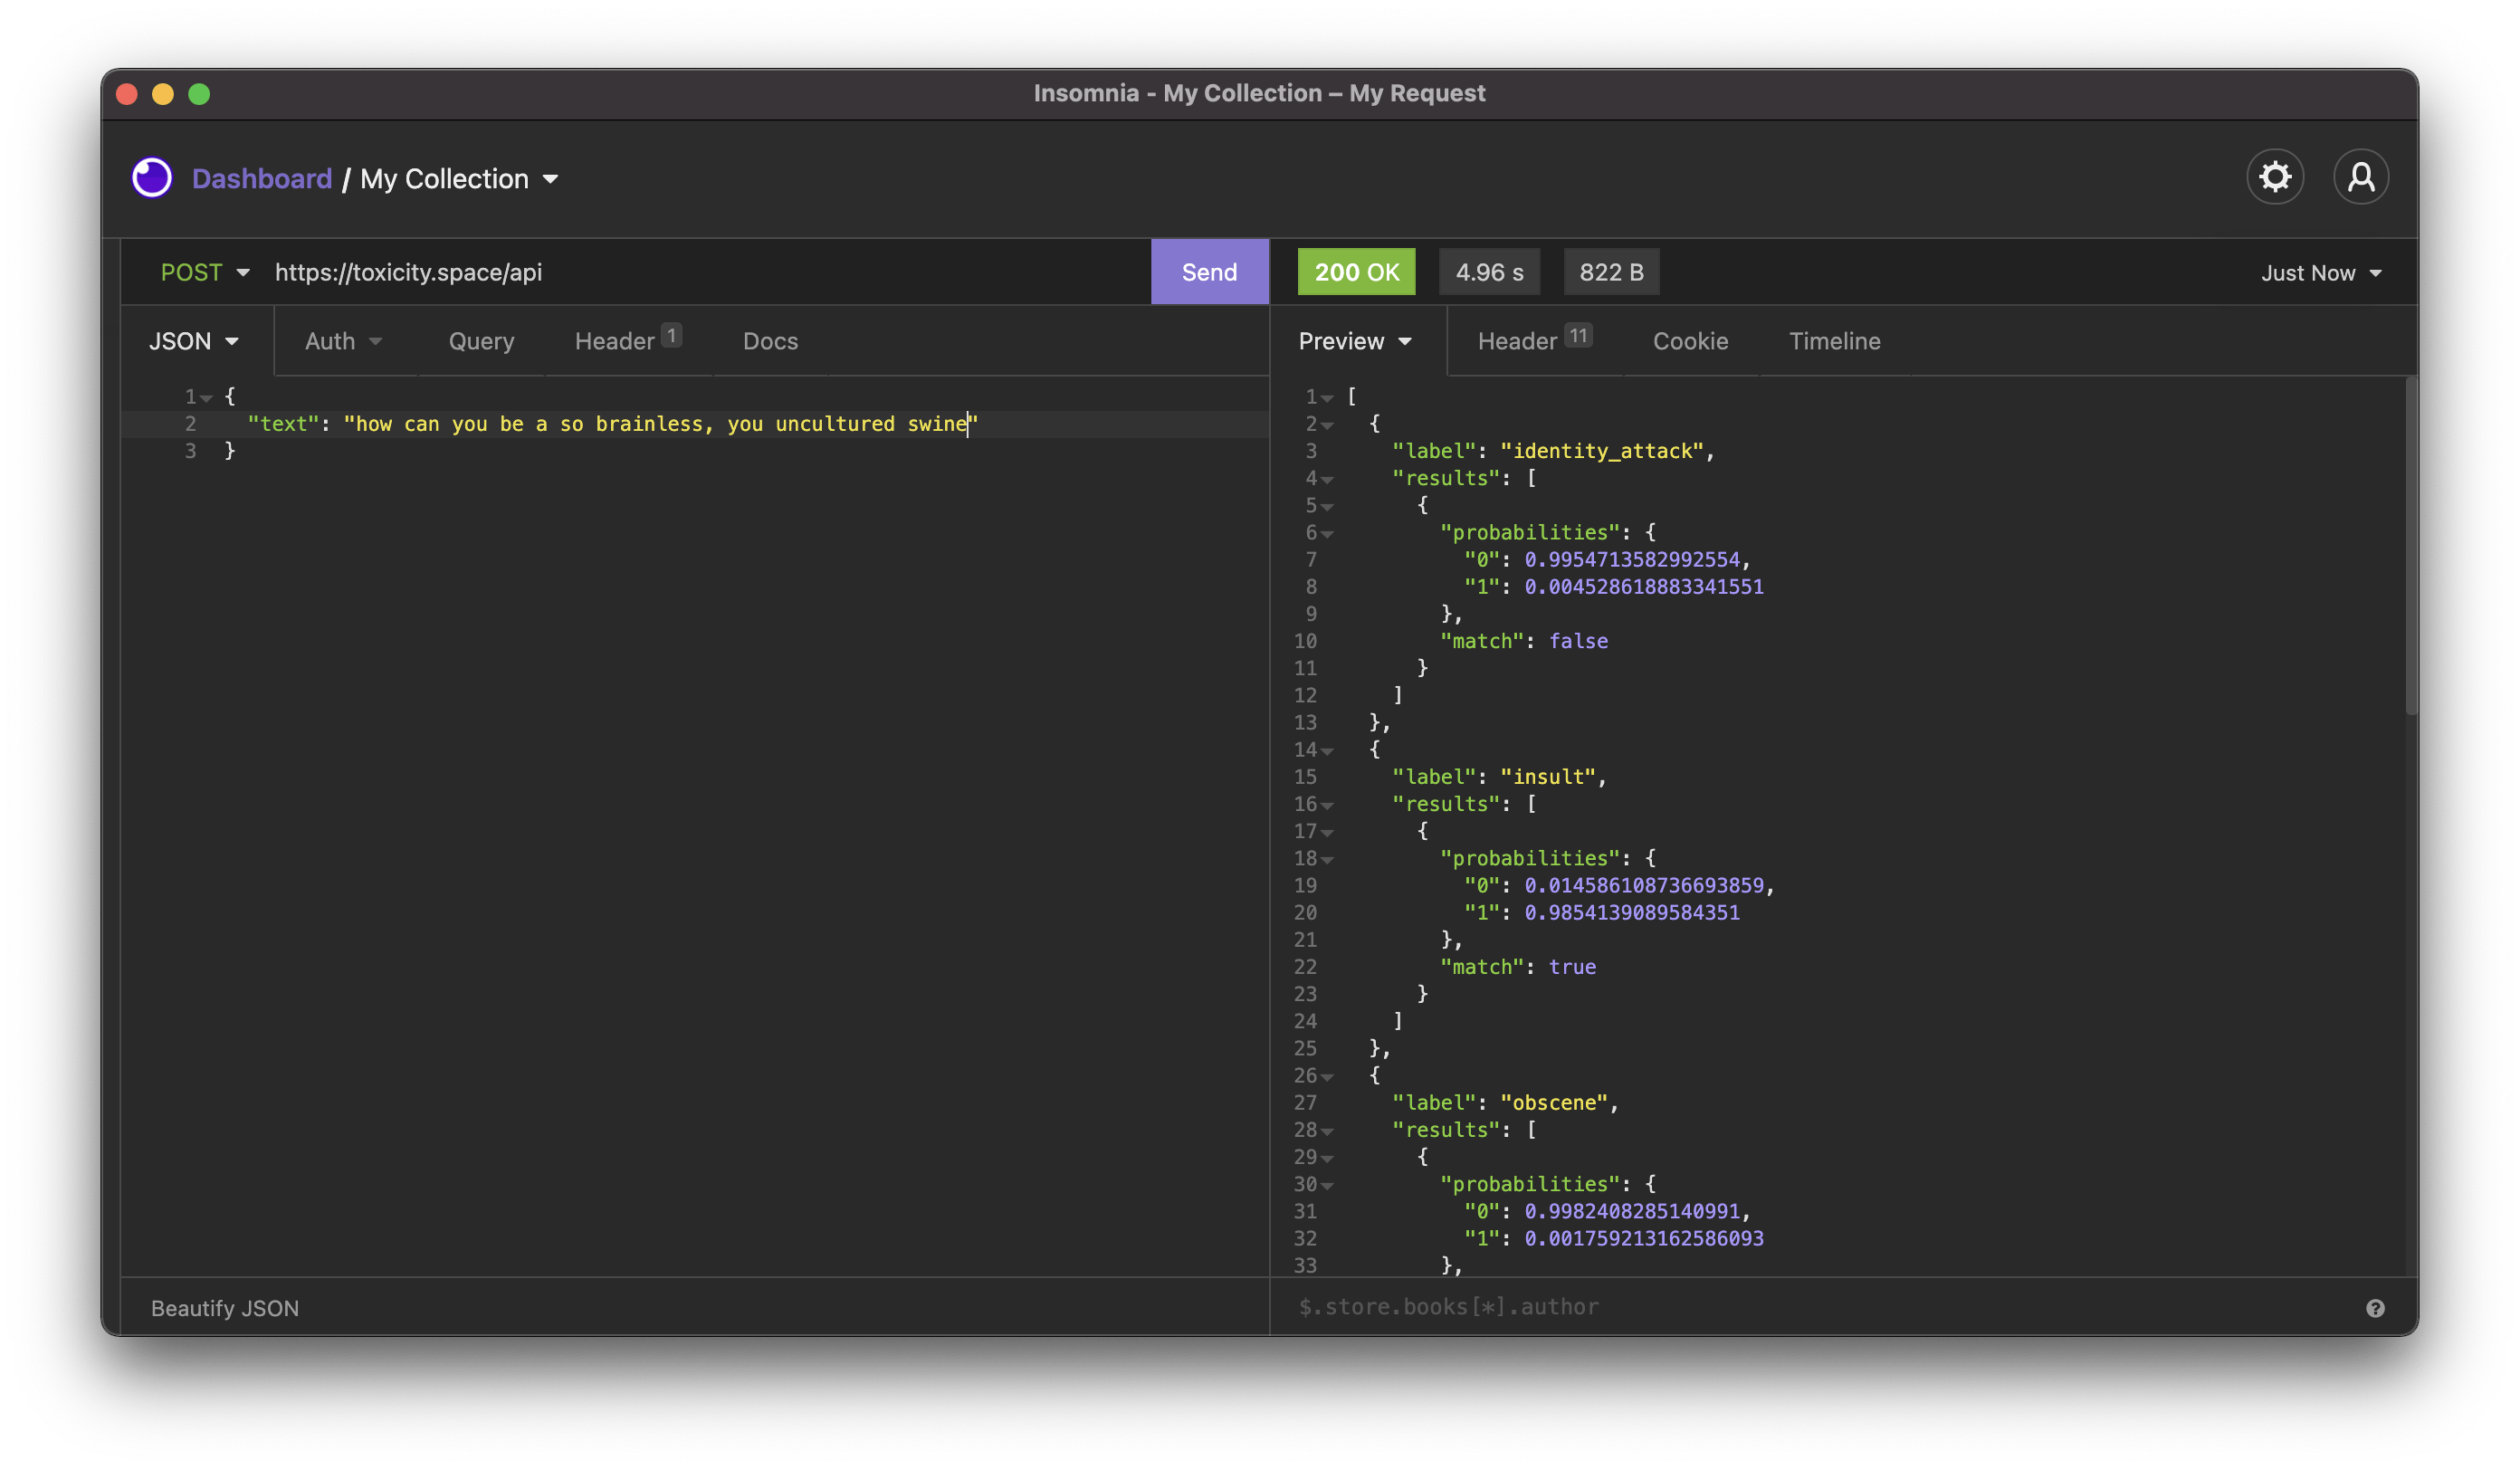
If you are a Developer, and currently want to integrate a third-party service to your app to detect toxic commentary, you can use the Toxicity Space API. It is as simple as sending a POST request to the https://toxicity.space/api endpoint, along with the JSON body.
The JSON should be formatted like this:
{
    "text": "your toxic comment text here"
}
Here's an example of the request using Insomnia:
If you are using Javascript for your application, you can use this code snippet to send the request to the API:
const requestOptions = {
      method: "POST",
      headers: { "Content-Type": "application/json" },
      body: JSON.stringify({ text: "hey, nice shirt you are wearing today" }),
    };

fetch('https://toxicity.space/api', requestOptions)
      .then((response) => response.json())
      .then((data) => {
        console.log(data)
      });
But if you want to use curl you can use this:
curl -X POST https://toxicity.space/api
   -H 'Content-Type: application/json'
   -d '{"text":"hey, nice shirt you are wearing today"}'
And the response would be something like this:
[{
    "label": "identity_attack",
    "results": [{
        "probabilities": {
            "0": 0.9999793767929077,
            "1": 0.000020627257981686853
        },
        "match": false
    }]
}, {
    "label": "insult",
    "results": [{
        "probabilities": {
            "0": 0.9998764991760254,
            "1": 0.000123428093502298
        },
        "match": false
    }]
}, {
    "label": "obscene",
    "results": [{
        "probabilities": {
            "0": 0.99997878074646,
            "1": 0.000021191595806158148
        },
        "match": false
    }]
}, {
    "label": "severe_toxicity",
    "results": [{
        "probabilities": {
            "0": 1,
            "1": 7.2631252123755985e-9
        },
        "match": false
    }]
}, {
    "label": "sexual_explicit",
    "results": [{
        "probabilities": {
            "0": 0.9999856948852539,
            "1": 0.000014256446775107179
        },
        "match": false
    }]
}, {
    "label": "threat",
    "results": [{
        "probabilities": {
            "0": 0.9999771118164062,
            "1": 0.000022887179511599243
        },
        "match": false
    }]
}, {
    "label": "toxicity",
    "results": [{
        "probabilities": {
            "0": 0.9997507929801941,
            "1": 0.00024918594863265753
        },
        "match": false
    }]
}]
It's not hard to understand what the result means, so let's take an example:
...
{
    "label": "toxicity",
    "results": [{
        "probabilities": {
            "0": 0.9997507929801941,
            "1": 0.00024918594863265753
        },
        "match": false
    }]
...
This means that the classifier engine tried to classify the input text in the toxicity category. But since we're using the Artificial Intelligence approach, it is using probability. The higher the probability score (from 0 to 1, hence the score is 0.999xxx for 0 and 0.0002xxx for 1) the higher its probability to be classified in those classes.
But what do 0 and 1 mean in the result? As simple as 0 is No, and 1 is Yes. So, if 0 > 1 it is highly unlikely that the input text can be classified as the toxicity comment. On the other hand, if 1 > 0 then it is highly likely that the input text is classified as the toxicity commentary.
We can also set the threshold in your application to determine the classes. Let's say 0.7, so if the probability score is greater than or equals 0.7, it will fall under the particular class.
If you find it too confusing, no problem, the topic is quite advanced in the Computer Science field. But if you want, you can learn in this field as I did before.
Alternatively, you can check the match value. If it is either false or null, then it's not classified as toxicity commentary, but if it is true, then the input text is classified as toxicity commentary.
Tada! You now understand how to read the rest of the results.
What's Next?
There are a lot of things that you can improve in this project. This is an open-source project, after all. You can contribute to this project if you are willing to.
Here are some things that you can improve:
| Items | Level | Description |
| API call examples | Beginner | Write API calling examples in various programming languages. Thank's to Omar Moustafa for the suggestion in the comment section. |
| API documentation | Beginner | Documentation is the landing page for the Developers. Better documentation means you can help more Developers to use this API. |
| User registration | Intermediate | Currently, the API is open and public, so everyone can use this. However, the hardware resource is limited, so only registered users can access the API. |
| API key/secret | Intermediate | After the user is registered, they need to generate the API key or secret in order to be able to access the API |
| Improve classifier accuracy | Advanced | We are currently using the basic classification engine for this project. It works, but there is room for improvement. |
| Improve classifier speed | Advanced | Hardware is a factor, but we can also optimize the code to improve the classifier speed |
If you have any other idea, you can suggest it in the comment section and I will add it here.
Let Me Know What You Are Building
That is all, I've written it detailed enough for you to understand how to consume the Toxicity Space API. Now it's your turn to let me know what you are building using this API.
You can leave your comment below, or ping me on my Twitter at @dkyhd.
Here are the important links about this project:
- Toxicity Space Website: toxicity.space
- Toxicity Space API Endpoint (POST): toxicity.space/api
- Github Repository: github.com/dkhd/non-toxic
This project is built with ♥️ by Diky Hadna to participate in the Linode x Hashnode 2022 Hackathon. If you love to be challenged, I highly recommend you to participate in this event as well. There's still enough time to build your app.

